Everything is available online in the vast universe of knowledge that we now inhabit. Without getting up from your sofa, you can do grocery shopping. Electronics may be purchased without leaving your sofa.
You’re not allowed to accomplish a few things, one of which is finish a do-it-yourself job. If not, then we hope you still find the material useful.
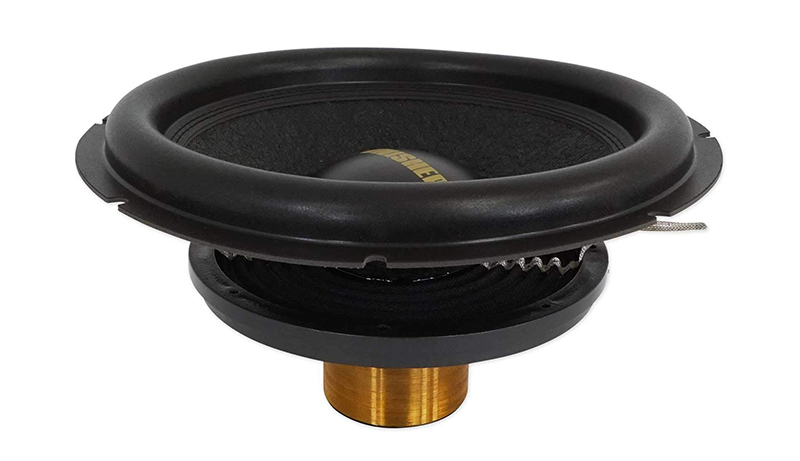
In this section, we’ll go further into reconing. reconfiguring a subwoofer in particular. The construction of a subwoofer and a speaker varies somewhat. One reason is that speakers don’t provide the low frequencies needed by a subwoofer to fit your sound system. Why would you want to recon them, though?
It’s really rather easy. Reconfiguring your subwoofer depends on time and usage. Perhaps your subwoofers aren’t sounding as well as they once did, or perhaps you unearthed these subwoofers in your grandfather’s cellar and want to instill in your children the value of restoration.
Your subwoofers could need to be repaired because they are worn out, damaged, or both. Wonderful for you since this post will address all of your worries and steps. Don’t forget to check the How To Tune A Ported Subwoofer Box.
Adjust Your Subwoofer
The passage of time is one factor that may need the reconfiguration of your subwoofer. You’ve undoubtedly owned this subwoofer for the past 20 years, during which time it has accumulated dust and the cables are beginning to break. It was transmitted from one generation to the next. Your subwoofer can sound as nice as a brand-new sub with a few simple tools and some work.
Fatigue is another factor that requires your subwoofer to be reconfigured. Splits and fissures cause vibrational damage to the cone itself. The subwoofer remaining in one place can be to blame for the accumulation of trash. Cracks and debris don’t go well together. in a…………………………. The subwoofer may get permanently damaged if the force is kept up. A subwoofer that is damaged might also be caused by outside items. A large item may have landed on the cone, a knife could have punctured it, or the subwoofer could have toppled. Calling a professional, paying them a hefty cost for parts and work, waiting a long time, and then receiving your subwoofer back would be the most expensive way to fix your cone or recon your subwoofer. Hopefully…
However, if you’d rather take a more DIY approach, recon your subwoofer by yourself using the instructions in this post.

Requisites for subwoofer reconfiguration
The following supplies are required for the procedure:
- Use a Phillips bit to drill
- Sandpaper
- Using a soldering iron and new solder
- a blade or knife
- Acetone container
- a cloth for cleaning
- Rubber adhesive glue
- Spider-infested new or replacement subwoofers
- Allen key.
- Grinder
- Chisel
- Shim or stock card 1 1/4″
- Hammer
Purchasing a brand-new speaker reconing kit is an option. You may get them at your neighborhood hardware shop or on Amazon. Once you’ve assembled your equipment and materials, set up a tidy, well-ventilated workplace. Basically one that has newspaper spread out on it, so it does become dirty. Let’s get going. Make sure you also check our guide for Electronics Insurance Plans – Phones, Cameras, & More.
How to Recon a Subwoofer.
- Delete The Old Components
- Take the speaker out of the cabinet.
- A chisel and hammer are used to remove the gaskets.
- Using a knife or blade, remove the soft components of your speaker, including the surround, by carefully cutting through any adhesive or glue keeping them together.
To get rid of the spider, cut it.
Advice: Use a cleaning cloth and some acetone to clean your spider.
- Not a real spider, the spider is a component of the subwoofer’s suspension.
- Disconnect any wires from their appropriate terminals.
- For a full wire removal, use a soldering iron.
- Using the soldering iron, clean the terminals as well.
- To clean the cone and coil assembly and remove any dust, lift the dust cover off the speaker to reveal it.
- Remove any residual material from the cone’s outer edges using a knife or other blade.
Clarify the voice coil.
- For this step, use a 1″ shim or stock card.
- The shim should be folded in a circle.
- The adhesive side of a piece of masking tape should be on the outside as you fold it over the shim.
- It should fit snugly once you’ve inserted it into the coil gap.
- To find any dirt, remove the shim with the masking.
- Continue doing this until the coil gap is spotless and the tape comes off without any traces of dirt.
- Use masking tape to cover the voice coil.
- Examine the tape’s removal for any dirt.
- Continue doing this until the tape shows no signs of having any dirt on it.
- Cover the voice coil with masking tape to shield it from the mess we’re going to make after there are no longer any traces of dirt.
- Fill the space with voice coil over shims.
- Remove any apparent dirt, metal fillings, or old dirt on the voice coil or in its vicinity using the cloth soaked with acetone.
Sanding and grinding
- Remove any little debris from the cone by grinding it.
- In the housing case, there are black specks left over from the previous cone.
- These particles can be removed by grinding them away or by chiseling and hammering them away with a sharp scraper.
- Remove any debris from the spider as well.
- During grinding, take care not to harm any of the subwoofer’s suspension unit’s components.
- You can use sandpaper to sand the leftover portion when the grinding is finished.
- Do this technique if you truly want to seem cleaner and more youthful.
Note: If you have an air compressor, use it to expedite the cleaning procedure even though it is not included in the supplies you’ll need.
Set up the cone
- The voice coil and any components inside the voice coil gap should be free of tape.
- With the help of a few friends, I was able to get a hold of a set of new parts for my old, broken, and broken-down sled.
- The remaining components should be dry fitted before any changes are made.
- Subwoofer may be moved to wrap snugly around housing unit.
Adhere the Components
Let’s follow all safety precautions before continuing with the gluing operation. Put on protective gloves if working with glue isn’t something you feel comfortable doing. A set of eye protection goggles is always a good idea.
- Lift the subwoofer a little while the pieces are dry-fitted.
- The cone’s and the spider-mounting surface’s edges should be covered with sticky glue.
- If you want a stronger grip, mix your five minute epoxy.
- Recall to act quickly since it dries out quickly.
- Apply with caution for a grasp on the edges.
Reminder: If you plan to use accelerator spray, wait until the surfaces are perfectly aligned before applying it.
- Make sure the cables are straight before installing your subwoofer.
- Use the openings on the side of your housing unit to feed the wires through.
- Soon, these wires will connect to the terminals.
- On the adhesive, press the subwoofer in place.
- As soon as you can, use clamps to hold the spiders down.
- Touch the rubber and adhesive where they meet along the subwoofer with your fingertips.
- Although not the only one, the method of gluing the sub into the case is a successful one.
- Your shims may now be taken out of the voice coil gap.
Dust Cap in the Middle
- Mark the location with a pencil, then center the cap on the cone (make sure it is a light color)
- Draw a mark with tape where the glue should go.
- Put a little amount of glue below the dust cap and then firmly press it to the cone.
- When the dust cap has been placed, set it with one or more heavy objects.
- Before testing the subwoofer, let the system to settle for roughly 24 hours.
A Subwoofer Test
Because certain leads need to be soldered, they might not be connected to any terminals. You may test your subwoofers after installation. To verify the bounce’s effectiveness, expose your subwoofers’ naked cable to a battery. For your subwoofer to appear to be working correctly, it must vibrate effectively.
Conclusion
Congrats! Your speaker recon has been finished. Instead of calling a professional and incurring all of those costs, you chose the more affordable, hands-on approach. Do you not feel honored?
Your body is experiencing a sensation of fulfillment as your subwoofer cone is now functioning properly. Why not redesign your speakers or construct a cabinet for your subwoofer if you feel that this was not a challenging enough task for you? Try it out! The fact that these materials are readily available on our website is a bonus! Go through some of the articles to learn how to become the handyman—or woman—you’ve always wanted to be!


Leave a Reply